Pages

Thursday, May 2, 2013

Monotype Prints - Squiggle Project #6


Applying ink to plexiglass
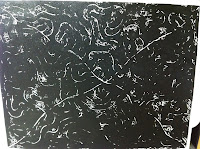
This work came from a fun evening spent with one of my best friends - Jennifer Schreer.  We love to spend creative time together so... for Christmas I signed us both up for a class at the Ann Arbor Art Center.  This class was part of a new series they're running this year - The Creative Social Club.  They run a different class on the first Friday evening of each month and do a different art project at each one with wine (and pop) included.  This month's project was monotype prints... which, even with two art degrees between us, neither one of us had done before.  A new adventure shared with a friend is always fun!!  This type of print involves applying ink to a smooth surface, we used panes of plexiglass, and then removing the ink to create your design.  Unlike standard block printing, which involves carving your design into a surface and then inking it to create your pattern.  So, we were giving a plexiglass piece with some ink on it, we rolled the ink evenly across it and then removed ink to create a "design".  To remove the ink we used q-tips, toothpicks and paper towels, each removing different amounts of ink and creating a different effect.  

The first design we did - the instructor called a "15 minute print"... and for any of you who know Jen and I... we literally laughed out loud at the prospect. LOL!!!  We have spent a whole day - literally - at a paint your own ceramics studio because it takes us that long to decide what we want to do and then get just the right design.  So, to say the least - we were both challenged by the first project.  I decided to keep it somewhat simple and just do a "squiggle" design which turned out pretty good.  
15 minute print


Once we completed the first one we were sort of set loose to create new designs and be creative with the tools available.  So I again went with the squiggles - SURPRISE!  :-)  This one took a little more time, for me it took the rest of the class.  I used toothpicks to draw/remove ink to create the design using the reverse design idea where half of the line is the positive space and on the other half of the design the line is the negative space.  I did get the whole thing done in the nick of time - which was stressful.  And then it got even more stressful - although I finished the design and was pretty happy with it... the print itself was not what I expected or hoped for in the end.  After all that time and racing the clock - it was an emotional disappointment.  I of course understand the creative process is often filled with trial and error which can be positive and negative but as a perfectionist... that error and negative can also be emotional and frustrating.  So, after the first print not being terribly successful - I made some adjustments/changes to the design and made a second print and then a third.  the second and third were better even though they were not the intended effect I was hoping for in the end.  I my have to go back and add some color to the original designs of the first print which should add some additional vibrance and fun.


This truly was a great experience!  One because I shared it with a friend but two because it was something new.  I'm not completely discouraged by this experience - as I would like to try again at home which, for a small investment, I can create a large variety of prints.  
Who knows what's to come!


Wednesday, April 24, 2013

A Pop-up - Squiggle Project #5

So, I'm a little behind schedule in getting projects posted - so over the next couple weeks I will be working on catching up.

This project was actually done around Valentine's day as you might have guessed. :-)  We were on our way to Houston, via plane, and I figured what better use of time than to work on another Squiggle Project.  So, I went through the book as usual and decided to try something I've not done yet... make a pop-up.  In all my years of card making I have never done a pop-up.  There are actually really simple instructions in the book, which is what I decided to use.  When I started I planned on using triangles as my design since that is what the center folds end up being. But after I cut the paper and made the folds... I quickly discovered I had a talking piece of paper - :-)  LOL!  It made a simple opening that resembles a mouth.  So, in the spirit of Valentine's Day... I created a set of big red lips with the pop-up in the center and for some additional color on the page - a few fun hearts. This one mounted to a piece of mat board could make a really fun 3-dimensional piece.  
So, with a big ole' kiss... have a great day and tell someone you love them!!

Thursday, February 28, 2013

Being Square! - Squiggle Project #4


Project #4 (day 292) was to Be square!  It was a very simple task of working only with squares (or a giant square with a bunch of objects).

This project was completed on Super Bowl Sunday - which I spent at home with a great friend after a long day of shopping the day before (IKEA rocks!!).  We're not huge football fans but we enjoy watching casually and we of course enjoy watching the commercials - some better than others this year.  So, we both decided to spend some time being creative, which we love doing together, and I figured it was a good opportunity to work on my next "365 project".

For this project I decided to pull out the black presentation/Bristol board and the oil pastels.  I chose these because first, I love the way colors pop on a black background and second, because I haven’t pulled out any form of pastels since college – and I'm pretty sure I've never worked with oil pastels… something new.

So, since this was new – I wasn’t exactly sure what to expect.  But after I played with them a bit before actually getting started and I quickly discovered - for me they are somewhere between soft pastels and crayons.  They were easy and fun to work with.  Oddly enough -  I actually like the “unfinished” look of the oil pastels on this paper.  They are much like the look of crayons, showing some of the paper color you're using underneath the color.  I think it’s actually a pretty good look and technique on the black background. 

The design of eight squares, in three different sizes, actually started as a plan for 9 squares of equal size – spread evenly across the page... because I'm all about even.  I then decided, after much debate, I liked the idea of larger squares accented with the smaller ones on either side – bringing me to my final design.


Wednesday, August 22, 2012

Dots, Dots and more Dots - Squiggle Project #3

Project #3 (Day 54) was to make something only using dots.  Ideas included stippling from a pen, the circles cut from paper using a hole punch or even small round price stickers.

After some time I decided to use paint pens/markers and 12"x12" acrylic canvas paper for this project.  I started by creating my squiggle line design using black dots.  Once the line of the dots was complete - I then went back and filled in around the "line" with multi-colored dots - filling in the page.

The final piece is pretty cool but this was a very tedious process.  When I started I did not draw out the initial line first - I only used the dots as I went.  If I try this again - I would change that step and draw out the line in pencil first in order to have a clear idea of where to fill in  the background color(s) or at make the line dots a different size from those in the background.


This project brought back memories of doing pointillism & stippling projects in Jr. High/High School.    Pointillism is a painting technique where small dots of color are applied to create an image/design.  Two well known artists who used this technique were Georges Seurat - most well known for Sunday Afternoon on the Island of La Grande Jette found at the Art Institute of Chicago and Paul Signac, who was influenced by Seurat, painted the Grand Canal which can be found at the Toledo Museum of Art.  Stippling is the process of shading using small dots of the same color to create images... the projects I created were primarily black & white designs... black dots on white paper but they were pretty great when they were done.

My eyes were a bit glazed over by the time I was finished, to say the least.

Monday, June 11, 2012

Paper and Only Paper- Squiggle Project #2

Well, Project #2 (Day 3) ends up being an extension of the first project.  This was to make something out of paper, but I was not able to use scissors or glue and couldn't draw on it.  So... since I wanted to explore the torn paper idea more - I tried the same technique from Project #1 only I used an 8"x10" sheet of paper.
Paper - Squiggle Project #2

It was reinforced through this project that the type of paper and the fibers in the paper make a difference on the ease or difficulty in tearing the paper while keeping to the nature of the squiggles.  It also effects the final look of the project.

As I finished this project, I was reminded of my love of the work created by one of my favorite artists, Henri Matisse - specifically his paper cut outs.  I love the way he used color and organic shapes to create amazing pieces of abstract art.  Matisse called this paper cut-out process "painting with scissors".  He would cut out designs from paper, saving the cut outs and the scraps, and then pinning them to the wall. Once the design was complete it was then glued to paper, canvas or board to create the finished piece.

As I mentioned on the previous post - I may need to explore this more.  Possibly with larger paper or multiple pieces of paper (different colors) linked together and maybe even using scissors instead of tearing the paper.


Thursday, May 24, 2012

Starting Small - Squiggle Project #1

As I mentioned in my second post - I picked up a copy of 365 - A Daily Creative Journal by Noah Scalin.  And since I was intrigued enough to actually buy the book I figured I should actually use it to keep the creative process moving.  Again, I know for a fact I won't be able to keep up with the "make something every day" but I'm using the book as a tool to think outside of my box a bit - therefore it won't be every day and I'll be jumping around the book.  I do intend to keep with the theme of my signature 'squiggle' designs as I work my way through the book - I even went as far as to put sticky notes on the days/projects that I felt were feasible based on my personality, time & space. :-) 
So... here we go.

My first project (Day 1), was to start small - literally.
The project for was to make something that fits in the palm of my hand and use only materials in my immediate environment.

Starting Small - Squiggle Project #1 (Day 1)
At the time I started this I was sitting upstairs at Zingerman's Deli in Ann Arbor & out for an afternoon with my husband.  So, needless to say the materials in my environment were limited.  but luckily Zingerman's leaves their half page ads on the tables.  For this project I actually used half of the half page ad to create a torn paper squiggle design (4"x5" piece of paper) - that fits in the palm of my hand.

This was a very different way to think about my squiggle design process.  It forced me to not only think about the positive space, the line, but also the negative space and technically the two lines that create that space - and do both at the same time.  It's very different from my normal single line process.

I think I will be trying this technique again - stay tuned.

Friday, May 11, 2012

A Photographic Adventure

The creative adventure continues... through the lens of the camera!

Happy Hearts
So, there are many coffee shops to be found in Ann Arbor, MI, as some of you may know.  That being said - there are a few that my husband and I frequent more than others and one of them is Espresso Royale Cafe located on Main Street in downtown Ann Arbor.  It's a great little coffee shop with lots of character and great outside seating, for those warm months, to watch the world go by.  All that being said.. one of the other great things they offer is an opportunity for local artists to showcase their art work on a monthly basis.

So, one day when I was in for my usual, white chocolate mocha, I asked about the selection process for the artists.  I was told an artist just needed to let them know they were interested, what type of art they create and talk with the manager.  I inquired a bit further only to find out that the month of May was open (it was the first part of April by the way).  OMG went through my head!  When I initially asked I was thinking like six months down the road because I really wanted to showcase my paintings - which was going to take some time.  So, after some contemplation, I thought - why not hang my photographs?!

Black-Eyed Susans
Photography has been a long time passion, more than 25 years and I love spending time outdoors, so much of my subject matter you will find to be nature related.  Specifically over the past few years I have been taking a pretty extensive collection of photos of flowers and in the past couple I have been creating an annual calendar (using iPhoto) for myself along with family and friends.  So, why not print, frame and showcase some of my favorite and best flower and nature related photographs?  I then confirmed that they were still looking for an artist for the month of May and I decided I was in... so I started the process of narrowing down the collection to 26 prints to fill the allotted space.

I knew this would be an undertaking - including both time and money but said "I'm going to do it".  So, I started researching framing and matting options and was quickly reminded of the number of options available.  I decided in the end to go with archival quality materials and aluminum frames from Frames Destination.  Based on the space I chose to use 8x10 prints framed to 11x14 along with two 16x20's.   When selecting the prints, they needed to be eye-catching and look great enlarged.  I also needed a selection of horizontal and vertical prints and a variety of colors and flowers represented.

So, approximately three weeks later and three hours of hanging prints (with the help of my wonderful husband)... 26 beautiful spring flower/nature photos are now hanging on the wall of Espresso Royale Cafe in Ann Arbor, MI.  If you happen to be in the area during the month of May - stop by for a coffee and check out my photographs.  They can also be found on my website.

Welcome to spring - summer is just around the corner!